Saturday, July 30, 2011

Butter Cream Cheese Frosting

As a kid, I was the one who'd eat the frosting and leave the cake.  { What can I say, I know what I like. } Cake batter came in at a close second for favorite sweet.  Still does.

{ Case in point. }
To this day, Duncan Hines Butter Recipe Golden cake batter and Wilton buttercream taste like childhood.  Crazy how things like that can make you so nostalgic.

{ Pretty sure I was about to dig into this thing face first. }
Lately, though, I've wanted something a little less sweet and a little more complex than buttercream.  Enter what I'll call Butter Cream Cheese Frosting.  Kind of like buttercream, kind of like cream cheese.  It's the best of both worlds, and I put this stuff on everything. { Much as I want to, I can't quote the Frank's Hot Sauce lady.  Hi Mom! }

{ Love this cake.  And this day.  And this man. }
Butter Cream Cheese Frosting
Ingredients
  • 1/4 cup solid vegetable shortening { I love the Crisco sticks... they're much easier to deal with }
  • 1/2 cup { 1 stick } butter, softened
    • Forget to set it out to soften?  Just pop it in the microwave, standing upright, for ten seconds on 50% power.  Bing!
  • 1 teaspoon vanilla
  • 4 cups confectioner's/powdered sugar { sifted, if you're hardcore }
  • 4 ounces { half a package } cream or neufchatel cheese
Primary Equipment
  • Bowl
  • Mixer { stand or hand }
  • Spatulas, both traditional rubber and offset
  • Optional pastry bag/tips for decorating
Instructions
  • Cream butter, shortening and cream cheese on medium speed for two minutes.
  • Add vanilla and mix well.
  • Gradually add powdered sugar, beating well and scraping down the sides of the bowl with each addition.
  • Once all sugar has been incorporated, mix for two additional minutes at medium-high speed.
Butter Cream Cheese Frosting can be tinted with food gel just like a buttercream.  And it holds its shape like one, too.  Just with a bit more tang.

Use immediately or refrigerate in an airtight container until you're ready to use it.  Whip it right back up and frost away!

Friday, July 29, 2011

The Best Red Velvet Cake. Ever.

I'm a big fan of The Cake { Mix } Doctor.  { Gasp! I admit it. I use cake mix sometimes.  No shame.  }

Cake mix is just flour, sugar and the like.  I'll be glad to let someone measure it out for me ahead of time, especially when I can buy it on sale at the grocery store for $0.99!

Not only are Ann's cakes awesome, she's a Georgia Bulldog.  Which pretty much makes her awesome by default.  And, she was an AOII! : ) Girlfriend has several cookbooks, and I have three of them.


This Red Velvet Cake is on page 104 of "The Cake { Mix } Doctor Returns."  And it's the one I used for the now infamous baby shower cake.  I can't go a day in the office without someone saying it was the best they've ever had!

30 minutes to make; 20 minutes to bake.  In about an hour you, too, can impress the socks off of folks with your culinary skills.  And no one has to know it started in a box!  { I won't tell if you won't. }


The Best Red Velvet Cake. Ever.
{ in my humble opinion }
Adapted from "The Cake { Mix } Doctor Returns"

Ingredients
  • Wilton Cake Release, non-stick spray, or solid vegetable shortening to grease the pans
  • Wax or parchment paper to line the pans
  • 1 18.5 ounce package plain butter recipe cake mix { Duncan Hines all the way! }
  • 2 1/2 tablespoons unsweetened cocoa
  • 1 1/3 cup buttermilk
    • Don't have any buttermilk?  Don't stress.  Add one tablespoon white vinegar for each cup of milk and let stand for five minutes.  Bingo.
  • 1 bottle { 1 ounce } red food coloring
  • 1/2 cup { 1 stick } butter, melted
  • 3 eggs
  • 1 teaspoon vanilla extract
  • 1 teaspoon baking soda
  • 2 tablespoons distilled white vinegar
Primary Equipment
  • Stand or hand mixer
  • Measuring cups
  • 3 9" cake pans
  • Spatula
  • Ice cream scoop or 1/2 cup measuring cup to divide batter
Instructions
  • Preheat oven to 350*.  Ensure rack is in the center of the oven.
  • Using a pastry brush { or paper towel }, grease three 9" round pans with Cake Release or shortening.  Be sure to coat both the bottoms and sides of each.
  • Line the bottom of each pan with parchment or wax paper.  { Separate post for how to cut the paper to fit perfectly coming soon! }
  • Next, throw everything into the mixer bowl.  Yes, everything.  And enjoy the fun reaction between baking soda and vinegar.  Hello, elementary school science class!
  • Beat on low speed until just mixed, about one minute.
  • Stop the mixer and scrape down the sides of the bowl with a spatula.
  • Crank the mixer up to medium-high and mix for two minutes.  Everything should be well incorporated and slightly fluffy.
  • Divide batter among pans using an ice cream scoop or 1/2 cup measuring cup.  Each pan will end up with about 1 1/2 cups of batter.
  • Bake for 17-21 minutes, or until a toothpick inserted into the center of each cake comes back clean.
  • Place pans on wire racks and let cool for 5 minutes.
  • Run a think metal spatula or knife around the edge of each pan to make sure that the edges are clear from the pan.
  • Invert cakes out of each pan onto a wire rack, then invert again onto a separate rack so that the cakes are right-side up.
  • Allow to cool for at least 15 more minutes before frosting.
Top with traditional Cream Cheese Icing or my favorite Butter Cream Cheese Icing.  Then, bask in the glory of compliments from serving the best Red Velvet Cake. Ever.

Monday, July 25, 2011

Julia, darling, I whole-heartedly agree!  { Not that I'm biased or anything. }
{ I saw this on my friend Erin's blog and I had to share. }

Thursday, July 21, 2011

Rainy Night in Georgia

The beautiful thing about making lasagna in aluminum loaf pans to freeze... is the rainy night when you can pull one out and have "homemade" dinner without lifting a finger.


Tonight is that night.

Tuesday, July 19, 2011

Mission Accomplished!

After six hours of baking on Saturday, four hours of decorating on Sunday, recruiting Spencer to sift powdered sugar and help with load after load of dishes... operation mega-huge-red-velvet-baby-shower-cake was a success! { And a blast, too. }

The actual cake recipe got more compliments than just about anything I've ever made, so more to come on that later.  But in the meantime, I thought you might like to see how it came to be.

First... the batter.  Five whole batches.  And when they say "red velvet", they mean "red" { whoever "they" are }.  We're talking about an entire one-ounce bottle of food coloring per batch.

{ I heart my KitchenAid. And was glad I went for the 6Q bowl. }
And batter batch numero uno went to make cupcakes.  Portioning with a 1/4 cup measuring cup makes for even results every time.  And using foil baking cups means that the dark batter won't show through after baking like it will with standard paper ones.  { Chocolate cake has that same issue, too.   But you knew that because red velvet is chocolate.  The Great Cake Debate continues. }


After the cupcakes, I went for the actual cake layers - two 12" and two 9".  Portioning with an ice cream scoop here ensures that each layer has the same amount of batter... and thus they end up the same thickness.  It's hard to see here, but each pan is also lined with wax paper on the bottom while the sides are just greased.  You're guaranteed that the cake won't stick!


In addition to the two 9" layers, I knew that I wanted the top of the cake to be curved like real hydrangeas would be.  I could have baked a third 9" layer and carved it into the dome shape, but I've never attempted cake carving before and this seemed like a high-risk time to learn.  Instead, I poured an inch or two of batter into my largest glass bowl and hoped for the best.


It worked like a charm.  But then between 24 cupcakes, two 12" layers, two 9" layers and a domed layer, I ran out of cooling racks and counter space in a hurry.  What's a girl to do?  Use the dining room table, of course.

{ Want these nifty cupcake boxes?  I order all of my packaging from B&G Paper Products. }
Now for the fun part.  Watching it all come together.  Let's start with the 12" layers.  First, the crumb coat.


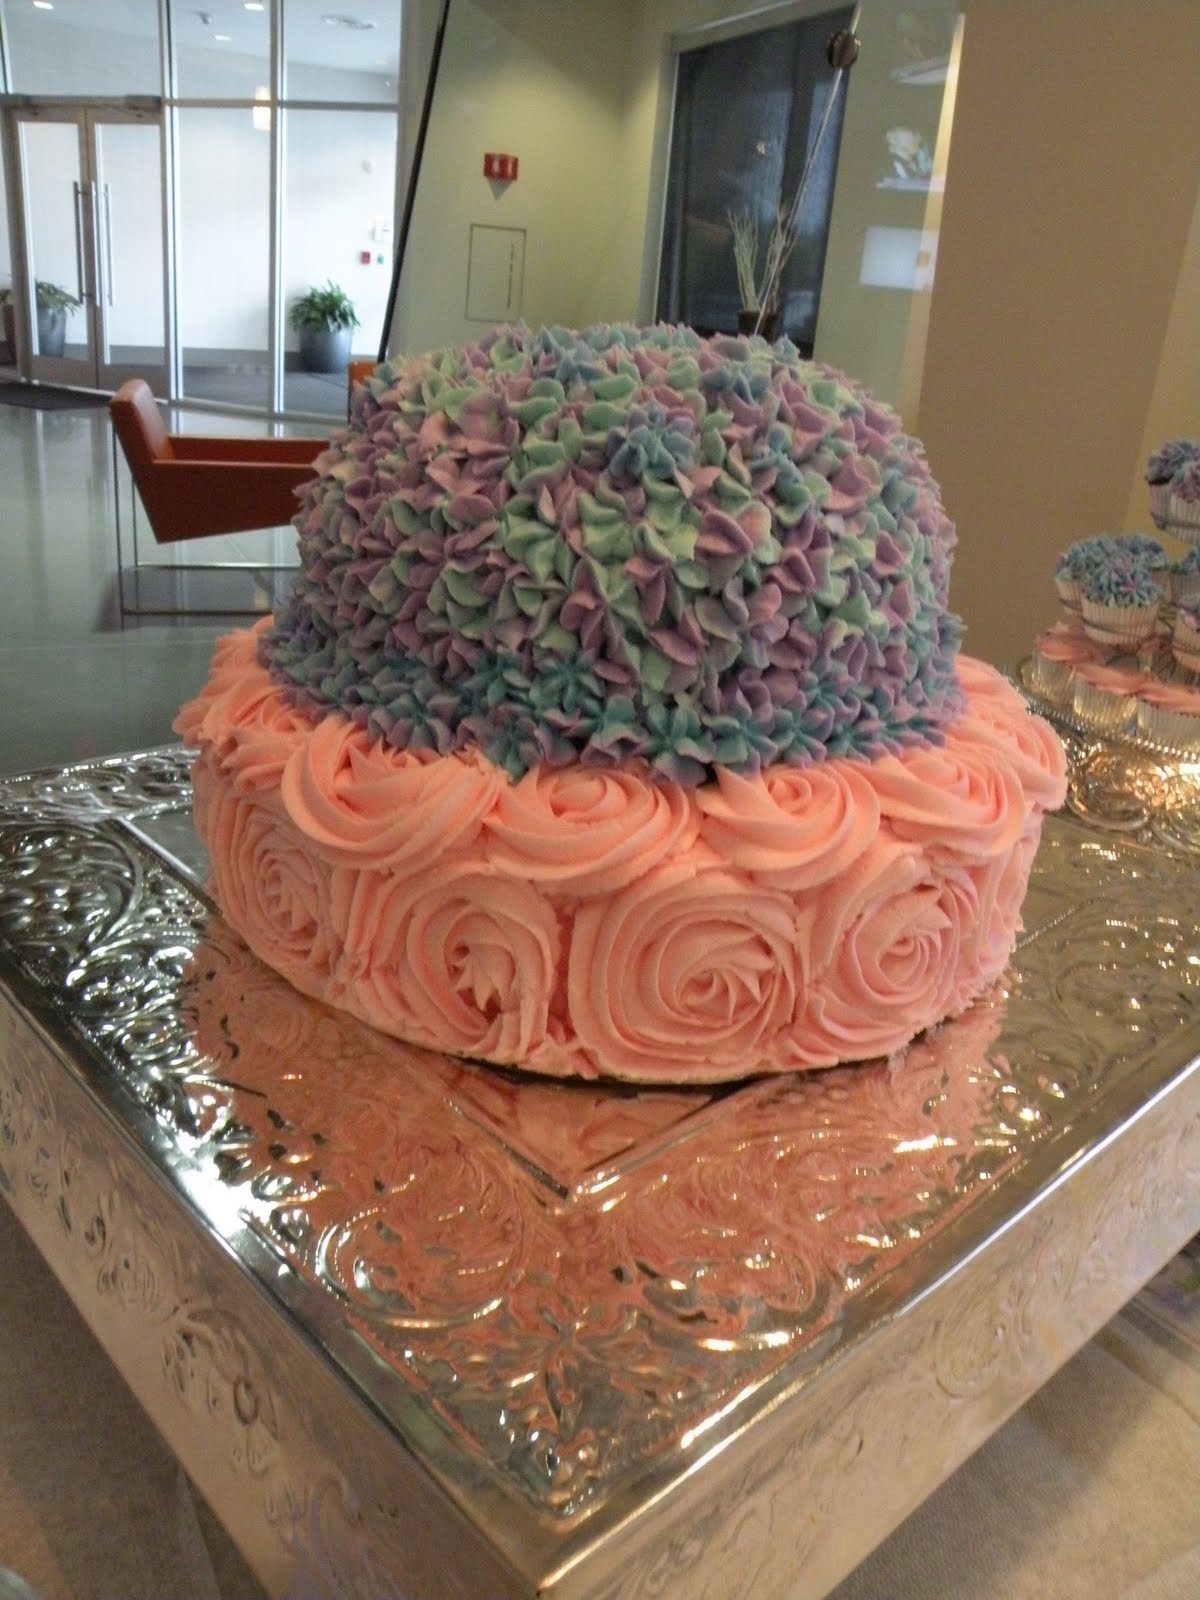
Then, rose by rose, it starts to look more like something worthy of the occasion.


A few more roses, straws stuck in to support the weight of a second tier, top it off with a 9" round to account for the other cake, and it's back to the fridge to set.


The process is similar for the hydrangea layer.  A blue crumb coat sets the stage.

{ See that great little dome? }
Then blue and purple frosting go side-by-side in a piping bag...


... and a few little hydrangeas start to take shape.


The more the merrier.  Almost there!


Finished and in the fridge.


At this point I was getting really, really excited.


I had Spencer drive like an old man all the way to work.  He knew his name would be mud if he took a curve too quickly or stopped short and the cakes got smushed.  But we made it!


And it was pretty tasty, too. : )  Witness the aftermath.  Spencer's sure glad I saved four of the "ugly" cupcakes for us to eat here at home!


It was a lot of work, but it was really fun to watch it all come together { and somewhat resemble the inspiration }.  Now the only thing left to do is decide what to make with the leftover buttermilk!

Thursday, July 14, 2011

A Baker's Marathon

This weekend, I will single-handedly undertake the largest culinary feat ever attempted in my kitchen.  And I am unbelievably excited.  Witness:
{ Pardon the wine.  It's not for the cake.  Technically. }
What IS all that, you ask? Why, it's...
  • 14 lbs of confectioner's sugar
  • 3 lbs of cream cheese
  • 4 lbs of butter
  • 18 eggs
  • 5 boxes of butter recipe cake mix
  • 1 gallon of buttermilk
  • 4 waxed cake rounds
  • One 12-inch cake cake pan { which will be baked in twice }
  • Three 9-inch cake pans
  • 48 cupcake liners
  • And the list goes on.
All for red velvet goodness to feed 125 people.  My sweet friend/colleague Amy and her husband are expecting a baby soon.  And we're throwing them a shower at work on Monday.  Like me and Spencer, they both work at our same company.  And they're very well-loved { hence the 125 people }.

I have friends who train for marathons.  It's a very admirable undertaking, and they train for months.  I feel sort of like I've trained for this, too.  I made mom the Rose Cake for Mother's Day.  I made Hydrangea Cupcakes not long before that.  And I made a massive trip to Costco on Sunday.

Combining the roses and the hydrangeas into one cake gives you something like this.
{ love i am baker }
And this is exactly what I'm going to attempt.  Though imagine it has pink roses and blue hydrangeas, since we don't know if Baby C is a boy or a girl.  It should feed 75 people.  Then for the other 50 or so, cupcakes!  Half with the hydrangeas, half with the roses.

I've got my apron ready.  If I thought I could start tonight, I would.  Bring it on!

Monday, July 11, 2011

Salted Brown Sugar Chocolate Chip Cookies

Sorry for the radio silence this week!  Another trip to Dallas.  I've got another dessert to recreate, and I can't wait.  Gooey Brown Butter Cake from The Porch.  It's just as awesome as it sounds.

But in the meantime... here's this weekend's creation.  After a whole week without baking, Sunday called for something quick and satisfying: Salted Brown Sugar Chocolate Chip Cookies.

Don't let the "salt" in the name scare you.  A generous dose of dark brown sugar balances out the tang for a great cookie with simple yet complex flavor.  These are hands-down my favorite chocolate chip cookies.  Ever. { And I'm a bit of a self-proclaimed cookie snob! }

Salted Brown Sugar Chocolate Chip Cookies
Makes twenty-four 4" cookies
Ingredients
  • 1 cup firmly packed dark brown sugar { you can use light brown, but dark is best }
  • 1/4 cup granulated {traditional white } sugar
  • 1/2 cup { 1 stick } butter, softened
  • 1/2 cup shortening
  • 1 egg
  • 2 teaspoons vanilla
  • 1 3/4 cup all-purpose flour
  • 1 teaspoon baking soda
  • 1/2 teaspoon salt
  • 1 cup { 6 ounces } semi sweet chocolate chips
Primary Equipment
  • Stand mixer or hand mixer and large bowl
  • Medium bowl or large measuring cup
  • Spatula
  • 2 cookie sheets
Instructions
  • Preheat oven to 375*.
  • Combine both sugars, butter and shortening in a large bowl and beat until light and fluffy.
  • Add egg and vanilla, mixing well.
  • Combine flour, baking soda and salt in a medium sized bowl.  Gradually add flour mixture to dough and blend until well combined.
  • Remove bowl from mixer { if necessary }, and stir in chocolate chips by hand.
  • Drop dough by rounded tablespoons onto ungreased cookie sheets, leaving at least two inches between each ball.
  • Bake for 9-10 minutes, or until edges are lightly brown. Center will remain slightly doughy.
  • Cool for one minute on cookie sheets.
  • Transfer cookies to rack to cool completely.

Enjoy!

Reality Check

Sunday, July 3, 2011

Ultimate Icebox Pie

So, the dessert that's been haunting me since my trip to Dallas a few weeks ago? I figured it out.  And it is every bit as good as I had hoped.  So if you're in need of a last-minute Fourth of July dessert, here's a definite crowd pleaser.

God bless America!

Ultimate Icebox Pie
Inspired by Hibiscus Dallas
Ingredients
  • 1.5 quarts vanilla ice cream
  • 30 classic Oreo cookies { just shy of a whole package, so go ahead and eat a few! }
  • 5 tablespoons unsalted butter, melted
  • 1/2+ cup assorted chopped chocolate candies
    • Want to know a secret? I used the last of our Easter candy! Butterfinger Eggs, Crunch Eggs and Caramel Eggs... but I wish I'd had some Reese's!
    • To make chopping easier, refrigerate the candy for a few hours before attempting to cut.
  • Fudge and/or caramel sauce
Primary Equipment
  • Food processor
    • Don't have a food processor?  Don't fret.  Just crush your Oreos in a zip-top bag with a rolling pin or meat mallet.
  • Springform pan
  • 2 large bowls
  • Hand mixer
  • Cutting board/knife
  • Spatula
Instructions
  • Refrigerate chocolate candies at least several hours before chopping into chunks.  Return chopped candy to fridge, especially if using anything that contains caramel.
  • Preheat oven to 350*.
  • Remove ice cream from freezer and set on counter to soften while you make the crust.
  • Place Oreo cookies in food processor and pulse until coarsely ground.
  • Transfer cookies to bowl and add butter.
  • Mix cookies and butter with a fork until well combined.
  • Press cookie/butter mixture into a springform pan, covering entire bottom and at least 1/2 inch up the sides.
  • Bake crust for 3-4 minutes. Remove from oven and allow to cool.
  • Meanwhile, whip softened ice cream with hand mixer until fluffy.  You just want it creamy enough to easily mix in your goodies.
  • Set aside a few tablespoons of chopped candy for topping.  Fold remaining candy into ice cream, just until evenly incorporated.
  • Spread ice cream and candy mixture into cooled crust.
  • Sprinkle reserved candy over top of pie and drizzle with caramel and/or fudge.  { I say both! }
  • Transfer to freezer and chill overnight.
  • Remove springform edge, slice with a warm knife { run under hot water to warm it up } and enjoy!
Next time, I want to try mint Oreo crust and mint chocolate chip ice cream with Andes mints mixed in...

Saturday, July 2, 2011

Saturday Supper: Italian Stuffed Chicken Breasts

This recipe is inspired by one in The South Beach Diet: Supercharged.  I bought it after we got engaged and was pretty hardcore for a while.  Even though now I'm not worried about fitting into a wedding dress, we still make some of the recipes.  And this one was a favorite from the get-go.  The original recipe didn't have enough flavor for our tastes, so this is my edited version.

It sounds harder than it is, I promise.  And since it sounds hard... it makes a great dish for having company over!  { Like maybe for impressing your mother in law. }

Italian Stuffed Chicken Breasts
Serves 4

Ingredients
  • 1/2 cup feta cheese { regular or reduced fat }
  • 1/3 cup sun-dried tomatoes { the jarred variety, not dry-packed }
  • 2 garlic cloves, minced
  • 1 teaspoon Italian seasoning
  • Freshly ground Black pepper
  • Salt
  • 2 teaspoons EVOO

Primary Equipment
  • Mini food chopper { recommended } or small bowl and a fork
  • Garlic press { I know it's a uni-tasker, but I swear by mine }
  • Cast iron { recommended } or other ovenproof skillet
  • Cutting board and knife

Instructions
  • Preheat oven to 425*.
  • Chop sun-dried tomatoes into small pieces.
  • Combine tomatoes, feta, garlic and Italian seasoning in small chopper or bowl and mix well.  { If using a bowl instead of a chopper, just mash well with a fork until thoroughly combined. }
  • Now, butterfly each chicken breast by slicing in from the long edge about three-quarters of the way through.  You're essentially creating a pocket in which to insert the filling.  You'll want an opening large enough to fill by, but leave enough uncut to hold it all in well.
  • Fill each chicken breast with one-quarter of the cheese/tomato mixture.  Press edges together to seal.
  • Season the exterior of each chicken breast with salt and a generous amount of freshly-ground pepper.
  • Heat EVOO in a large, ovenproof skillet over medium-high heat.  I find that cast iron works wonderfully.
  • Brown chicken in skillet, about two minutes per side.  { You're not looking to cook it all the way through just yet, only to sear the surface to a nice, golden brown. }
  • Transfer skillet to oven and bake for about 20 minutes, until chicken is thoroughly cooked.
  • Serve warm and enjoy!  { Psst... leftovers are great cold and sliced on top of a salad with balsamic vinaigrette. }